

انواع سوئیچ دوربین مدار بسته
انواع سوئیچ دوربین مدار بسته
در اینجا ابتدا به معرفی سوئیچ شبکه می پردازیم.
سوئیچ شبکه یک دستگاه سخت افزاری است که
وظیفه برقراری ارتباط بین دستگاه ها در یک شبکه (شبکه محلی)
و انتقال بسته های داده (Packet) از مبدا به مقصد را برعهده دارد .
سوئیچ های شبکه به دلیل داشتن پردازنده در درون خود ,
بسته های داده ورودی و خروجی را بافر می کند ,
که باعث می شود سوئیچ در هدایت بسته های داده هوشمند تر عمل کرده و کنترل بیشتری را اعمال کند.
از طرفی می توان گفت سوئیچ ابزاری است هوشمند , که فریم های دریافتی از پورت ها را می گیرد
و براساس آدرس مقصدی که در فریم درج شده ,
روی پورتی منتقل می کند که ماشین مقصد به آن پورت متصل است .
اطلاعات موجود در شبکه به صورت بسته داده و فریم انتقال می یابد
و هر فریم و بسته از اطلاعاتی مانند آدرس مبدا و آدرس مقصد تشکیل شده است.
انواع سوئیچ دوربین مدار بسته
برای مطالعه ادامه این مقاله کلیک کنید.
سوئیچ شبکه دوربین مداربسته
برای دوربین مدار بسته تحت شبکه باید سوئیچ مناسبی را انتخاب کرد،
سوئیچ ها دارای سرعت های متفاوتی هستند و آنچه برای دوربین های مدار بسته
مورد نیاز است دو نوع با سرعت های ۱۰/۱۰۰Mbps و ۱۰/۱۰۰/۱۰۰۰Mbps
می باشد، برای استفاده از سوئیچ های با سرعت نامبرده شده باید
به تعداد دوربین های مدار بسته که به سوئیچ شبکه
متصل می شوند و کیفیت این دوربین ها توجه کرد
زیرا سرعت انتقال بسته های اطلاعاتی در سوئیچ ها
بسته به نوع آن ها می باشد و
برای مثال اگر مقدار انتقال حجم تصاویر شما به یش از ۱۰۰ مگابیت در ثانیه برسد
و از سوئیچ با سرعت انتقال ۱۰/۱۰۰Mbps استفاده کنید تصاویری
را که دریافت می کنید در زمان واقعی خود نبوده و با فاصله زمانی نسبت
به زمان واقعی خود به نمایش در می آید و مورد دیگر ممکن است
تصاویر به کندی به نمایش درآیند. موارد نامبرده شده
یک ضعف برای سیستم نظارتی شما به شمار می رود.
سوئیچ شبکه دوربین مداربسته
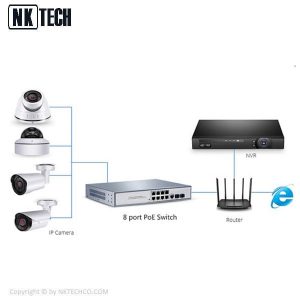
استفاده از سوئیچ در نصب دوربین مدار بسته
شما با توجه به نیازتان می توانید انواع سوئیچ دوربین مدار بسته مورد نیازتان را با توجه
به تعداد دوربین های نصبی انتخاب کنید.
برای مثال سوئیچ شما از ۸ یا ۱۶ پورت ۱۰/۱۰۰Mbps برخوردار است
در این صورت شما می توانید ۶ الی ۱۰ دوربین مدار بسته تحت شبکه را به آن متصل کنید.
مهمترین جنبه نصب سیستم دوربین مداربسته انتخاب نقاط مناسب
برای دوربین و DVR برای به حداکثر رساندن پوشش دوربین و
به حداقل رساندن طول کابل است.
(که به نوبه خود باعث کاهش تلفات خطی می شود که بر کیفیت فیلم تأثیر می گذارد).
برای قرارگیری بهترین دوربین های امنیتی در منزل ،
گوشه ای از اتاق را انتخاب کنید که در آن بیشتر نقاط ورود به اتاق نمایان است.
پریز برق نیز باید در نزدیکی باشد.
برای فضای باز ، یک مکان بالاتر را انتخاب کنید که در ، پنجره ها ، گاراژها و غیره را پوشش دهد
نقاط بالاتر از ۱۰ فوت را انتخاب کنید تا به راحتی از بین نرود.
انواع سوئیچ دوربین مدار بسته
تعداد پورت های سوئیچ
تعداد پورت های سوئیچ در شبکه های LAN متفاوت می باشد.
به همین دلیل انواع سوئیچ دوربین مدار بسته در بازار وجود دارد.
هرچه کسب و کار کوچک شما بزرگتر باشد و کاربران شبکه بیشتری داشته باشید ،
به پورت های بیشتری نیز احتیاج دارید.
سوییچ های پیکربندی ثابت معمولاً
با پنج ، هشت ، ۱۰ ، ۱۶ ، ۲۴ ، ۲۸ ، ۴۸ یا ۵۲ پورت در دسترس هستند.
سوئیچ های چند پورت پردازش و انتقال داده ها را ساده می کند.
مدل های سوئیچ با چندین پورت برای پشتیبانی از دامنه
کامل پروتکل های بسته داده در دسترس هستند.
سوئیچ ها می توانند عملیات لایه پیوند داده (۲) یا لایه شبکه (۳) را ارائه دهند.
برای سیستم امنیتی IP خود به چه نوع سوئیچی نیاز دارید؟
پورت های ۱۰۰ مگابیت بر ثانیه:
در یک پروژه دوربین مداربسته ، دوربین ها
برای جریان ویدئو با کیفیت HD کامل (۱۰۸۰ ۱۹۲۰ ۱۹۲۰) با سرعت ۱۵ فریم بر ثانیه
به حدود ۲٫۵ مگابیت بر ثانیه نیاز دارند (تنظیمات پیش فرض برای اکثر دوربین ها)
اگر از یک سوئیچ ۲۴ پورت با انتقال ۱۰۰ مگابیت در ثانیه در هر پورت استفاده می کنید ،
این بدان معناست که شما فقط از ۲٫۵ درصد ظرفیت هر پورت در هر جریان ویدئو استفاده خواهید کرد.
پورت های گیگابیتی:
در بیشتر موارد ، سوئیچ ها باید فقط پورت هایی با سرعت ۱۰۰ مگابیت در ثانیه
برای اتصال دوربین ها داشته باشند ، با این حال ، برای اتصال بین دو سوئیچ یا با سرور
می توانید از پورت گیگابیت استفاده کنید که به شما امکان می دهد ترافیک ۲۴ پورت در یک پورت واحد.
پهنای باند:
معمولاً سوئیچ هایی با پورت ۲۴ – ۱۰۰ مگابایت در ثانیه
و ۴ پورت ۱۰۰۰ مگابیت بر ثانیه با پهنای باند ۱۲٫۸ گیگابیت بر ثانیه وجود دارد ،
این بدان معنی است که ما می توانیم از حداکثر ظرفیت همه پورت ها بدون مشکل استفاده کنیم.
فیبر نوری:
برخی از مدل های سوئیچ ورودی ماژول فیبر نوری را دارند
تا اتصالات را در فواصل طولانی امکان پذیر کند.
افزونگی:
اگر در پروژه خود نیاز به استفاده از افزونگی دارید ،
سوییچ توانایی کار با پروتکل های استاندارد STP و RTSP را دارد
که افزونگی با سرعت بالا را تضمین می کند.
شبکه مجازی (VLAN):
در پروژه هایی که نیاز به جدا کردن ترافیک پخش و پیاده سازی امنیت دارند ،
VLAN ها بسیار مفید هستند ، بیشتر سوئیچ ها به شما امکان می دهند
حداقل ۲۵۶ VLAN را با استاندارد پروتکل ۸۰۲٫۱Q مدیریت کنید.
امنیت:
برای اجرای امنیت توصیه می شود برخی از ویژگی ها مانند
۸۰۲٫۱X ، Radius و TACAC را داشته باشید ،
بنابراین فقط دوربین ها و سرورهای نظارت / ضبط می توانند به شبکه متصل شوند.
اطمینان حاصل کنید که سوئیچ دارای فناوری لازم برای اجازه دادن به این نوع امنیت است.
COS و QoS:
در شبکه ای با دستگاه های مختلف ، گاهی اوقات لازم است
که برخی از آنها اولویت بندی شوند ، در این صورت استفاده
از فناوری COS (هزینه خدمات) و کیفیت خدمات (QoS) باید روی سوئیچ موجود باشد.
Multicast:
در صورت لزوم کار با پخش multicast ، سوئیچ باید اجازه استفاده
از پروتکل های خاص مانند IGMP snooping v1 ، v2 یا v3 یا IGMP querier را بدهد.
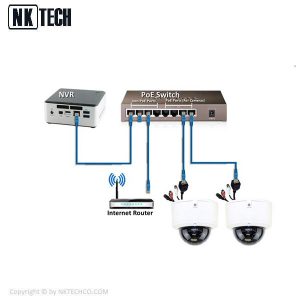
نحوه استفاده از سوئیچ poe
سوئیچ های PoE مشتریان را قادر می سازد تا به طور کامل
سیستم های دوربین امنیتی PoE خود را شخصی سازی کنند.
فناوری PoE برای دوربین های امنیتی بسیار مفید است.
از سوئیچ های PoE معمولاً برای نصب در تاسیسات بزرگتر
مانند انبارها یا کارخانه ها یا هنگام نصب سیستم بین دو ساختمان استفاده می شود.
وقتی دوربینی با PoE داخلی به NVR متصل می شود ،
آدرس IP و تنظیمات پیکربندی را از NVR دریافت می کند تا آن را در شبکه داخلی نگه دارد.
What kind of switch do you need for your IP security system?
۱۰۰Mbps ports:
In a CCTV project the cameras require around 2.5 Mbps for full HD video streaming (1920 x 1080) at 15 FPS (the default setting for most cameras). If you use a 24 ports switch with 100 Mbps transmission per port, that means you will use only 2.5% of the capacity of each port per video stream.
Gigabit ports:
In most cases, the switches need to have ports with only 100 Mbps to connect the cameras, however, for the connection between two switches or with the server you can use the Gigabit port that allows you to sum up the traffic of the 24 ports in a single port.
Bandwidth:
Usually there are switches with 24 – ۱۰۰M bps ports and 4 1000 – Mbps ports with a total bandwidth of 12.8 Gbps, this means that we could use the maximum capacity of all ports without problems, but we already know that we don’t need that much for cameras.
Fiber Optic: Some switch models have fiber optic module inputs to allow connections over long distances.
Redundancy:
If you need to use redundancy in your project, the switch has the ability to work with standard STP and RTSP protocols that guarantee high-speed redundancy.
Virtual LAN (VLAN):
In projects that need to isolate broadcast traffic and implement security, VLANs are very useful, most switches allow you to manage a minimum of 256 VLANs with the 802.1Q protocol standard.
With wide use of HD IP Camera, it is very important to choose an appropriate switch that meet the whole network structure of a monitoring system. An appropriate switch not only can enable the function of the monitoring network system, but also effectively reduce the waste of resources.
Switch Capacity
Switch Capacity is the max data capacity of switch interface processor or the max data capacity between interface card and data bus. It shows the switch ability for total data exchanging, and its unit is Gbps, also called switching Switch Capacity. The Switch Capacity value of switch is higher, the process ability of data to is higher. Switch Capacity calculation method: Switch Capacity = Port numbers * Port speed * 2
Switch Capacity≤Nominal Switch Capacity, then the switch is wire-speed, also called non-blocking.
Forwarding Performance ( Sum of all port forwarding rate)
Forwarding Rate,also is known as port throughput. It refers the data packet forwarding ability of a port in switch, the unit is pps (packet per second). In general, the forwarding rate for a low-end router is from a few K to a few ten Kpps, while for a high-end router, the value could be reach to ten Mpps (Million Packets per Second), even hundreds Mpps.
Forwarding rate calculation method: Forwarding rate = Full configuration gigabit port numbers * 1.488Mpps + Full configuration 10/100M port numbers * 0.1488Mpps. As ONV product POE31016PF for an example, it is with 16x 10/100M Ports and 2x Gigabit Uplink Ports. Its forwarding rate is 5.3568Mpps (16*0.1488Mpps + 2*1.488Mpps).
A word about cost…
Networks last a long time and require monitoring and maintenance for best results, so in planning your budget, it’s crucial to consider both the purchase price and ongoing operating costs.
Purchase Price
Unmanaged switches are generally cheaper than managed switches because they are much simpler devices. However, this simplicity means they are unable to adapt to changes, so their useful lifespan may be shorter than a managed switch.
Operating Cost
Unmanaged switches must be physically touched to reboot them or change their configuration, which requires skilled engineers onsite. Travel costs, time and business disruption can be unwanted side effects of waiting for fixes. In contrast, managed switches can be remotely controlled, so changes can be made quickly with minimal cost and disruption.
Total Cost of Ownership (TCO)
Combines purchase price and operating cost over the long term, and can be lower with a managed switch, particularly if the switch is in a remote or hard-to-access location. Additionally, managed switches improve business agility because they can adapt to new requirements and take advantage of new opportunities.
So, how do you choose the right switch for your application?
The table below is a quick guide to the best switches to consider for different applications. An Allied Telesis WebSmart switch has some management ability, and can be a good compromise where a fully-managed switch is not ideal.
Removing the Camera from the NVR
Our IP security cameras have a plethora of settings that can be accessed from the camera’s built-in web interface. When a camera is connected to a NVR with built-in PoE, it receives IP address and configuration settings from the NVR to keep it on an internal network. While this is great for network security reasons, it prevents direct access to the web interface of the camera. If the user wants to change the camera’s shutter rate, or IR LED strength, the camera would need to be disconnected from the NVR and accessed from a computer.
The first steps include understanding how a camera and PoE NVR work together, noting the IP address the camera is configured to and finally physically removing the camera from the NVR. The video below discusses these concepts in detail.
۱٫ Use a PoE injector to supply power and data
A PoE injector will have two ports, one labeled for PoE or P+D/Out (power and data) and one labeled LAN or Data/In. Connect the PoE injector to a power outlet. Connect an ethernet cable from your PC’s network port to the Data/In on the PoE injector. Connect a second ethernet cable from the network camera’s RJ45 network jack to the port labeled PoE or P+D/Out. To check if everything is connected properly refer to the lights on the PoE injector and the port on your computer. If you do not see any indication lights you may have a bad cable or do not have the wires connected properly.
۲٫ Use a 12VDC 1A power adapter
A correct power adapter will have a label stating it is 12VDC 1000mA. If you have any concerns about the correct power supply please feel free to email our support team. Power the camera by connecting the adapter. Connect an ethernet cable from the camera directly to your computer’s ethernet port. A good way to check if the camera is receiving power and communicating with your computer is to look at the lights on your computer’s port. If you have no lights it is important to test that your cable and power supply work with another device.
۳٫ Configure your PC’s network port to communicate with the camera
For your computer to “speak” to your camera, you need to set its network port to the same IP address scheme as the camera. Before we disconnected the camera from the back of the NVR, we noted what the IP address of the camera was.
Login to your Windows PC, change your computer’s ethernet adapter to communicate with the camera. Use the Network & Internet settings which contains an Ethernet section. Using the change adapter settings set an IP address for your computer that matches the network for the camera. If you do not know how to do this refer to the video above for this step.
۴٫ Test the connection with the Ping command
After powering the camera and configuring your computer to talk with it, it is good practice to test the connection using the Ping command. Simply open the Command Prompt and type Ping with the address of the camera. In our case we used the following command: ping 10.1.1.65
۵٫ Access the camera using Internet Explorer
It is important to use Internet Explorer as it is the most compatible browser for accessing security cameras. Type the IP address of your camera into the address bar in Internet Explorer. Some cameras may require initialization and it is recommended to uncheck the Easy4IP and auto-update options when proceeding through the prompts. The password can be admin, or may be printed on the label found on the box of the camera. Note: the customer is responsible for any password change beyond the defaults. There is no master reset password.
۵٫ Access the camera using Internet Explorer
After successfully logging into the camera you need to install a plugin to view the camera. Click the link in the center of the page to download the plugin. Make sure to Run and do not save the plugin download. Internet Explorer will prompt you to allow the plugin to run. Once the plugin is installed, you will be required to log back into the camera. You should now see video from your camera and can modify the settings of the camera in the Setting tab within your browser. Make sure when you are done modifying your camera(s) that you change your network settings back to “Obtain IP address automatically” in your network settings, this is demonstrated in the video above.
۱٫ Power the camera like you would for the previous method
As shown in the video, you can use a PoE injector or 12V DC 1amp power adapter to power the camera and connect to your network router or switch. The process is simple. It is very important to use a CCTV Camera World approved device or you risk frying the camera due to incorrect voltage.
۲٫ Connect the camera to your network router
Instead of connecting the camera directly to your computer, you will connect it to your network router so the computer can communicate with the camera over the network. When following this guide, it is important to connect the camera and computer to the same router or switch. We suggest using a hardwired connection between the computer and the router to prevent a situation where your WiFi network is different from the wired network. If you are knowledgeable about your network setup, feel free to use a WiFi laptop.
انواع سوئیچ دوربین مدار بسته
۳٫ Use the ConfigTool to find the camera and change its IP address
Using the ConfigTool to find the camera on your network is fairly easy and is covered in our guide on how to connect a network surveillance camera to a computer. It is imperative that you turn off any firewall or antivirus program on your computer that may prevent the program from sniffing your network.
انواع سوئیچ دوربین مدار بسته
۴٫ Access the camera’s web interface using Internet Explorer
The steps are similar to method A because the web interface will be the same regardless of how you connect to the camera.